Menu Tabs

Sunday 5 August 2012

Blogging with Windows Live Writer 2011. 1.Let’s begin!

There are many users who blog who have never heard of Windows Live Writer, so I have decided to spread the word about the best blogging editor out there bar none. I can guarantee that once you have tried out Writer, you’ll wonder how you ever managed without it and as its free, what have you got to loose? Firstly you’ll need to download it to your computer as its a desktop program, but the upside of that is you can write your blog posts offline if you have no internet connection, and publish to your blog later at a time to suit you.

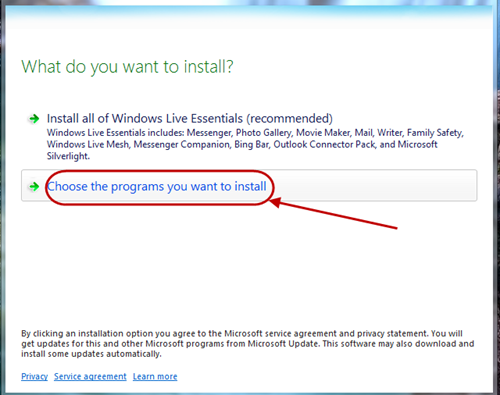
1. Go to http://windows.microsoft.com/en-US/windows-live/essentials-other-programs where you can download the 2011 Essentials Suite. Once the installer has downloaded, you will see a Window where you can choose which programs to install, just Live Writer or any of the other programs. As an aside, Photo Gallery works quite well with Writer and is a free photo editing program that you may find useful.

Choose your programs to install

2.  NOTE!  This edition of Live Writer does not work with XP, if you are using XP you will have to download the previous version of Writer. In Vista and Windows 7, its a good idea to pin Writer to your taskbar so that it is just one click away to use. Once downloaded and installed, Writer will invite you to Configure it for your blog so click on Next.

Configure Live Writer

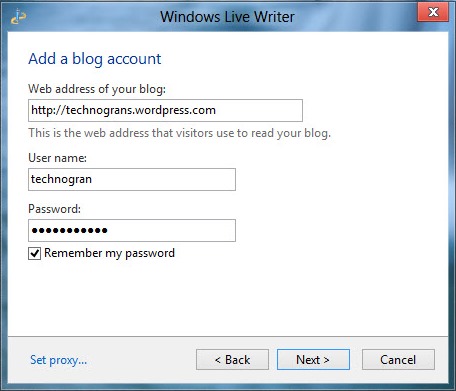
3. Choose the blogging platform that you use, Wordpress, Sharepoint, Blogger or Typepad. Writer will also work with LiveJournal and most other blog platforms. For my demo I am going to set up two of my blogs, one on Wordpress and one on Blogger. In the topmost area you need to put the URL  (website address) of your blog. If you don’t know this, go to your blog online and note or copy the address from the address bar in your browser.

Filling in the details of your blog

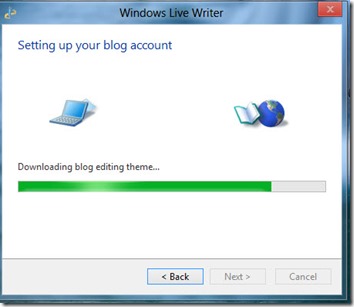
4. Tick the remember my password if you don’t want Writer to be constantly asking for it and then select Next. Writer will then begin to fully sync with your blog settings, the background, the fonts you use, in fact every detail of your blogs theme or template will be synced with. This is so that you can see exactly how your posts will look as you compose them and before publication. It’s what makes Writer so unique and to my knowledge, it is the only blogging editor that is capable of true WYSIWYG syncing.

Writer does its stuff

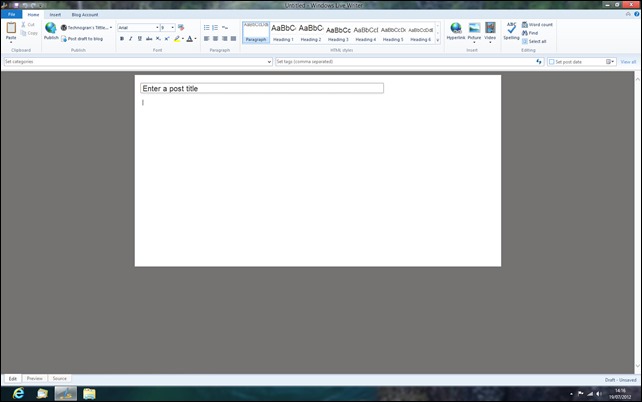
5. As soon as Writer has completed its sync with your blog, you will see the post area of your blog in its entirety presented in the Writer editing window as shown below.

WYSIWYG edit screen

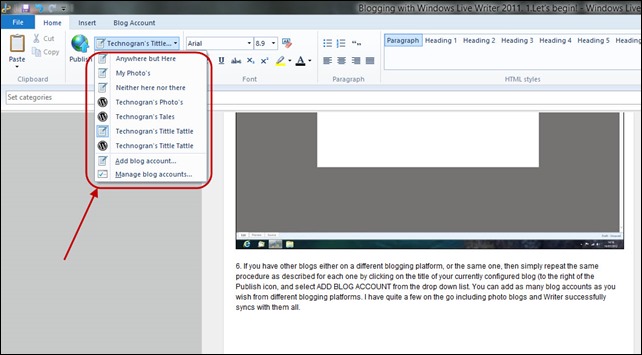
6. If you have other blogs either on a different blogging platform or even the same one, then simply repeat the procedure as described for each one by clicking on the title of your currently configured blog (to the right of the Publish icon, and select Add Blog Account  from the drop down list. You can add as many blog accounts as you wish from different blogging platforms. I have quite a few on the go including photo blogs and Writer successfully syncs with them all.

Showing list of my blogs

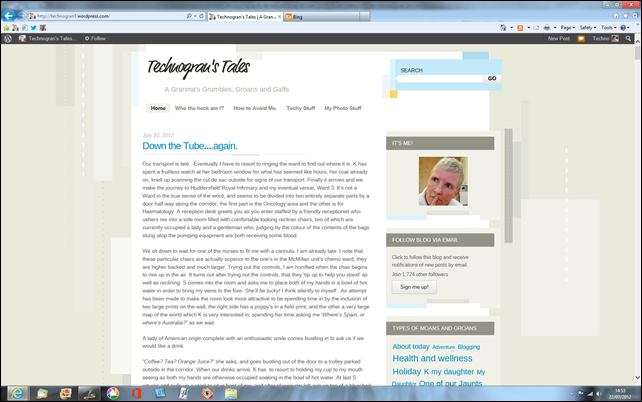
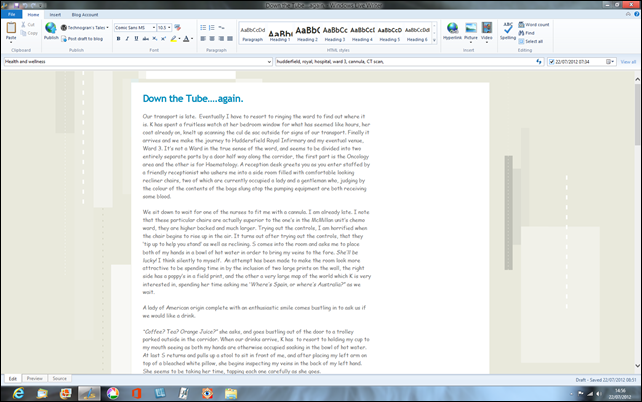
The full sync is best illustrated with another of my blogs which uses a fairly complicated looking theme on Wordpress. In the next two screens I am showing you the blog itself online in Wordpress and then the editing screen inside Writer to illustrate how Writer really does show your posts exactly as they will look when published.

Firstly, here’s my blog as it appears online.

Screenshot (53)

  And here is that very same post in the Writer editing window where you write and compose your blog post.

Screenshot (54)

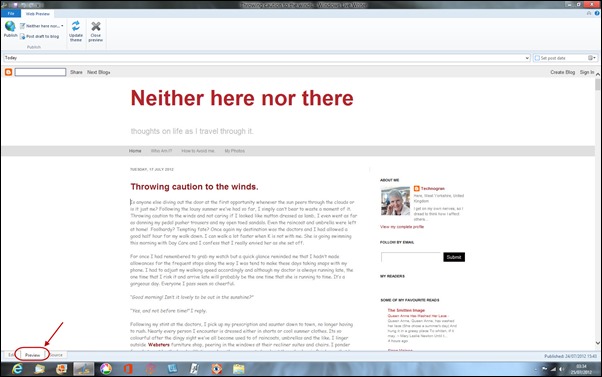
Of course the sidebar is missing, we don’t need it for composing the actual blog post of course, and the blog title is also not necessary, but all fonts used, size of fonts etc are present and correct, as is the theme used itself. In a later post, we’ll cover writing one post and then posting the same post to more than one blog which I tend to use fairly often. To see the whole of your blog including the Title and the sidebar, simply click on Preview at the bottom left hand side of the editing screen.

Preview your post

Next post we’ll cover beginning to write your post, choosing your fonts and size of fonts, choosing a header and taking a look at general formatting of your post.

Technogran
Blogging with Windows Live Writer. 2. Writing your post.

The Home Ribbon.

Now we’ll take a look at setting out your posts as you want them to look. Above the Editing screen, you’ll no doubt have noticed the Ribbon interface used in Writer. When you open Writer, the HOME ribbon is the one visible to you by default. This ribbon consists of the following areas, Clipboard (which I never really use personally, so for now we’ll ignore it) Publish (where you are given the choice of publishing your blog once completed, either as a viewable post or as a draft post) Font where you can choose which font you would like to use for this post and its size etc, Paragraph which includes bulleted, numbered lists and quotes. This is followed by HTML Styles, and once you set your cursor into the main writing area, the Paragraph choice will be highlighted by default, followed by various headings to choose from, Insert, where are given the choice of inserting either a Hyperlink, Picture or Video, and finally Editing where you can check your spelling, find a word and select all of your post.  Let’s work our way through them shall we?

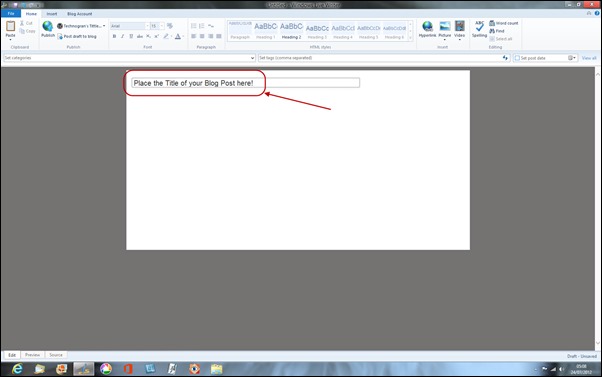
Filling in your title

1. Place your cursor in the post Title area and fill in your Post Title. You can’t choose different fonts or sizes for the post title in Writer, this is dictated by whichever theme you are using.

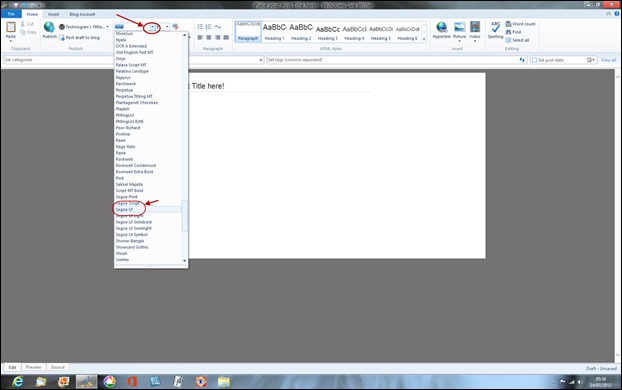
2. Once you have completed your post title, click return to move down to the writing area. Now the Paragraph icon in the HTML styles will be highlighted. If you don’t wish to add a header to your paragraph, you now need to choose your font and size that you wish to use, and also its colour if you wish to change it from the default one’s used in your blogs theme. To change the font, click on the small arrow next to the font box. A drop down list will appear that you can scroll down. Choose your font from the list.

Choose your font

For this how-to, I’ll choose Segoe UI. Note that all fonts that are available on your computer, including any that you have downloaded, will also be available to use in Writer including those used in Word.

3. When you have chosen your font, click on the size box on the right of the font box to select the size of your font. In my case I could go right up to 36 size

which is quite large! The small icon on the right of the

size box will clear all formatting, returning you to clear text, so use with caution!

4. Below the font box are other choices for your text. You can make it bold italic underline it if you wish to make it stand out place a strike through it as if you had crossed it out do a subscript or superscript and also highlight some of your text including choosing the colour. In order to do that, you will need to highlight that particular text by selecting it all via your left mouse button and holding it down until all of your chosen text is highlighted.

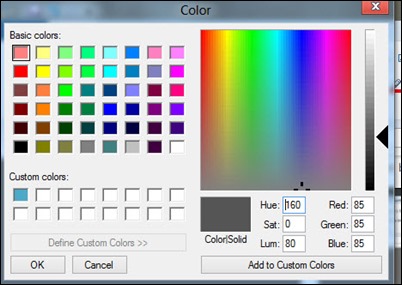
Choosing your own colour

5. Finally you can choose the overall colour of your written text, and this is best chosen right at the beginning at the same time as you choose your font and size. If you click on the underlined A, a drop down box will appear with the colours for you to choose from. If you are not happy with the default choice of colours available, click on More Colours followed by Define Custom Colours to choose your own. See screen grab above.

  • In the Paragraph area of the ribbon, you can add a bulleted or numbered list. by simply clicking on each.
  • Now whenever you begin a new line, a bullet or a number will automatically be added to your text.
  • To stop the bulleting or numbering, simply deselect it.

6.

You can also make selected text into a block quote like so by selecting the ‘quote’ icon to the right of the bullet and numbering icons. Once you have completed your block quote, just deselect it.

7. Normally when writing you want your paragraph to always be left aligned or placed against the left side. However, you might want to include a paragraph or part of your writing that is centred on the page or even placed up to the right hand side.

To centre your text simply select the centre icon by clicking on it. It will be highlighted and any text place in your post from then on will begin in the centre of your post and move outwards, but will remain central until you deselect the Centre icon. Try it out to see exactly how this works and how it looks.

You can also do the same with the Align Text to the right.

Finally you can Justify all of your text, or just a paragraph. Justify makes the words in a paragraph ‘spread out’ so that they all line up at both the right hand side of your post and also the left hand side as well. This is done by spacing each word and some people like it better because it looks neater as it doesn’t end with different length lines. As you can see by this paragraph. Of course, if you have never done any word processing, you won’t be familiar with any of this!

8. Next let’s choose a header. Normally I never have the need to place any headers in my blog posts, but if you are writing a more ‘professional’ looking post, you might want to use headers in order to talk about separate subjects or areas of your subject. To include a header, place your cursor at the beginning of a new line, and select one of the headers in the HTML styles area.

This is my Header.

As you can see, depending on the style of your blog theme, some of the headers include a dotted line underneath.  If you don’t want this, then choose one of the other headers that do not include the line.

This is Header 3.

As soon as you begin a new line after you have placed your header, Writer automatically selects the Paragraph formatting for you.

Next post, we’ll tackle inserting a Hyperlink, a Picture and also a Video into your post.

Technogran

Blogging with Windows Live Writer 2011. 3. Let’s insert something!

One of the best features of Live Writer is how you easily it allows you to insert Hyperlinks, Pictures, Videos and even maps into your blog posts and have complete control over whereabouts they are positioned and how they look. We’ll tackle each one in turn.

Hyperlinks

1. Firstly adding a Hyperlink. What is a Hyperlink? Well, this is best illustrated by demonstrating one. Let’s say you are doing a blog post about a recent holiday and you mention the place visited. This could be a town, or even a restaurant. For this post I’m going to use the example of The White Hart Hotel in Hayle, where we enjoyed a very nice lunch during our last holiday. Firstly I need to find out if The White Hart Hotel has a website. It has. Now I need to copy the URL of the website by highlighting the URL in the address bar in my browser and then returning to Writer.

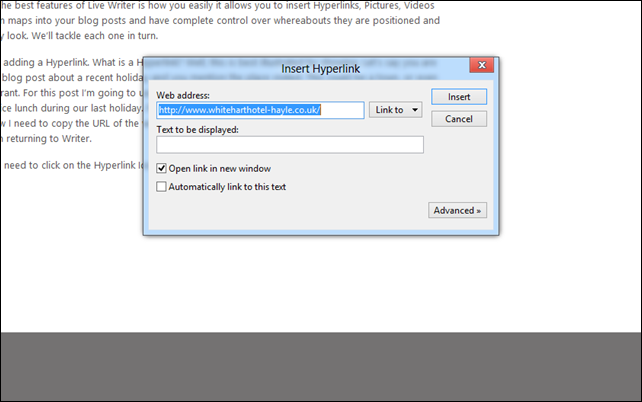
Screenshot (65)

2. Next I need to click on the Hyperlink Icon in the ribbon. The web address that you just copied in your browser will automatically be inserted in the Web Address box. All that you need to do is fill in the words that will be associated with that address inside the Text to be displayed box. (Linking.) For this demo, I’ll use White Hart Hotel in my text, and I’m also going to tick the box ‘Automatically Link to this Text.’  Click on INSERT. White Hart Hotel will appear in your post, and whenever any reader clicks on those words, they will automatically be taken to the relevant website. You can do this with any word/words used in your post that has a relevant site. So when I talk about Windows Live Writer, I can direct my readers with a Hyperlink to the webpage describing Windows Live Writer and its features. The colour of the Hyperlink will be dictated by the link colour set in your blogs theme, but you can make it stand out even more by highlighting it and then making it bold. (See above.) Try clicking on both of my Hyperlinks and see where you are taken.

Pictures

3. Next, we’ll insert a picture. Clicking on the Picture icon from the INSERT area of the ribbon produces a drop down list of choices consisting of

  • From your computer
  • From the web
  • Create an online Album (This album will be stored in your SkyDrive.)
  • Add an online album (Already available from your SkyDrive)

4. Clicking on From your computer will take you to your pictures folders, usually the last one you had open, so that you can choose a picture to insert. All you need to do is simply click on a picture from your library and it will be inserted into your post. NOTE! The picture will be inserted wherever your cursor happens to be in your text so its best to use return to begin a new line before inserting a picture.

Butterfly in Christchurch, New Zealand

Your chosen picture will be aligned to the left hand side of your post by default and will be the smallest size. We’ll run through changing its size and position in a future post.

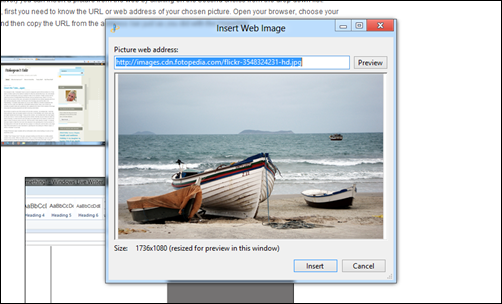
5. Alternatively you can insert a picture from the web by clicking on the second choice from the drop down list. However, first you need to know the URL or web address of your chosen picture. Open your browser, choose your picture and then copy the URL from the address bar just as you did with the Hyperlink.

Screenshot (68)

6. Insert the Web Address by right clicking with your mouse and choosing Paste. Your chosen picture will appear in the small window. You can Preview it first if you wish. If your happy with it, click on Insert, and your chosen picture from the web will be inserted into the post where your cursor is currently positioned.
     .

Photo Album.

7. The next choice is Create Online Album so let’s choose that next from the drop down list.

    Screenshot (69)

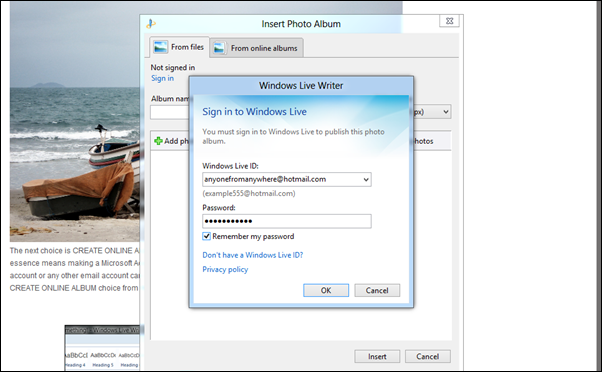
8. A window will open for you to choose From Files or alternatively From Online Albums. (Albums that if you already have a SkyDrive account, you already own.)  You firstly need to sign in, and clicking on Sign In opens a sign in window where you can fill in your credentials in the relevant boxes, choose whether or not you wish Writer to remember your password or keep asking for it, and click on OK.

9. If you don’t own a Microsoft Account (you can use your Hotmail/ Live account) then click on Don’t have a Windows Live ID? to be taken to the relevant webpage where you can create a Microsoft Account. You will then have access to SkyDrive which you can use to store all of your photos/documents etc for free.  When you have done that, fill in your credentials in the window and click on OK.

10. Now you can create your first online album and display it in your post. Your visitors will be able to access the album by clicking on it and also view all of its contents as a slideshow. So let’s add some photos to our album!

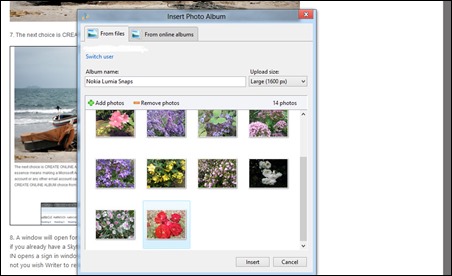
11. You add photos by either opening your pictures folder in a separate window and simply dragging them over to the Add Photos window one by one, or alternatively click on the green + Add Photos choice, highlight the photos that you wish to include in your pictures folder and they will be added to the album.

Adding photos to your albums

12. When you have added all of your chosen pictures, click on Insert. As you can see below, your photos will now be displayed in a very attractive manner inside your post. By default they will be aligned to the left hand side of your post, but you can change this by clicking on top of the whole album, (a striped square will now appear at the edges of your photo album) and a new Tab will be highlighted above the ribbon in Writer called  Photo Album Tools. Underneath you will see the tab Format. Click on it and the ribbon will change to show completely new choices and icons to use.

13. This ribbon will appear every time you click on top of a Photo Album or a single picture, although the choices offered are slightly different for a single picture.  We’ll tackle these in a later post, but for now you’ll see that the Alignment area is highlighted. To centre your new Photo Album, simply click on the Centre icon. Now your photo album is placed central in your post and looks much neater and tidier.

We’ll cover all the things that you can change about how your Photo Album is displayed and work our way through all of the different choices open to you in a later blog post, but for now we’ll leave this demo Album as it is. Writer will automatically save the whole album to your SkyDrive when you publish your post.

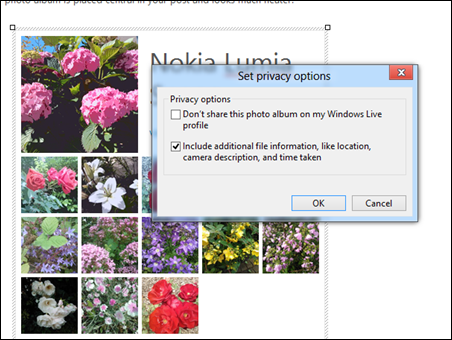
14. The other choice we need to set up before publishing our blog post containing the photo album is to set up our album privacy. Seeing as our album is part of a blog post and you probably want all of your readers to be able to look at it and access it fully, it might be best to set this as Public, unless of course you only wish certain readers to see it, in which case you will have to set their permissions individually. Its much easier therefore to make a photo album public when you insert one in a blog post. To do this, click on top of the album again in order to invoke the Photo Album Tools and then click on Album Privacy icon. This will be set at ‘Don’t share this photo album on my Windows Live profile’ by default, so untick that choice.

Screenshot (72)

15. You are also offered the choice to include additional file information like the location where you took each photo, camera description and time taken. You can disable this if you don’t want it included by unticking it. Click on OK.

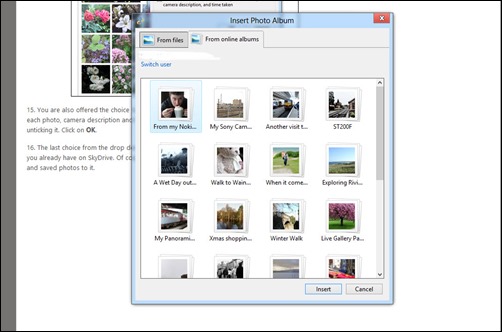
16. The last choice from the drop down list under the Picture icon is to include an album in your post that you already have on SkyDrive. Of course this will only apply if you have had a SkyDrive account previously and saved photos to it. If you are new to SkyDrive then this choice is not applicable until you have some albums saved. Here’s my choice of albums. To insert one of your current albums into a post, simply click on it to select it, and then click on Insert.

Adding an online album from SkyDrive

17. Writer will download your chosen Album where your cursor is currently placed inside your post and display it as before aligned to the left hand side and as the default display. As before you can click on top of the Album to bring up the Photo Album Tools and then Centre your photo album in your post as before by choosing the Centre alignment under the format tab.

Next post we’ll cover adding a video to our blog post from the different choices offered, and also take a look at inserting a map as well.

Technogran.

Blogging with Windows Live Writer 2011. 4. Inserting Everything bar the kitchen sink.

Insert Ribbon.

Up until now during this tutorial, we haven’t moved from the HOME ribbon, which has contained most of the choices that we needed to make.  We’re now going to take a closer look at the INSERT ribbon, where there are lot’s of other things we can insert into our blog posts.

1. Click on the INSERT tab above the ribbon. Immediately the ribbon changes to a much more detailed one featuring everything that you can insert into your blog posts. Let’s take a look at all the other things we can insert into our posts shall we? 

Insert ribbon

As you can see from this screen shot, we can insert (under the Break area) a Horizontal line, a Clear Break and a Split post. (The latter being where you can post a short summary to be shown on your Home page, and then continue to read the full post by clicking on ‘more’ etc. You can also add a Table into your post, and under the Media area of the ribbon, we have the previous Hyperlink, Picture and Photo Album (which work in exactly the same way as before) Video, Map, Post Tags and Emoticons to show your readers how you are feeling at that time in your post.

Lastly you can add some Plug-ins to Writer which add enhancements such as the Facebook plug-in or Twitter plug in, which automatically send an update to either as you publish a post. Let’s try working our way through the BREAKS area first.

2. Click on Horizontal Line.


A line is then placed inside your post. Next, try the Clear break choice.
Your cursor will do a return and move to a new line.  Next let’s try out the Split Post.

Blogging with Windows Live Writer 2011. 5. A closer look at photos.

Picture Tools

Once you have inserted a photo into your blog post, there are a plethora of choices open to you. You can precisely place your photo in your text, resize it, crop it, add effects and an assortment of other features and additions.  So this post, I’m going to concentrate on these photo features.

1. Once your photo is inserted into your post, click on top of it in order to open the PICTURE TOOLS ribbon. As you can see, this contains a vast array of choices and we’ll work our way through them one by one. Reading from the left of the PICTURE TOOLS ribbon is Crop.

Picture Tools ribbon

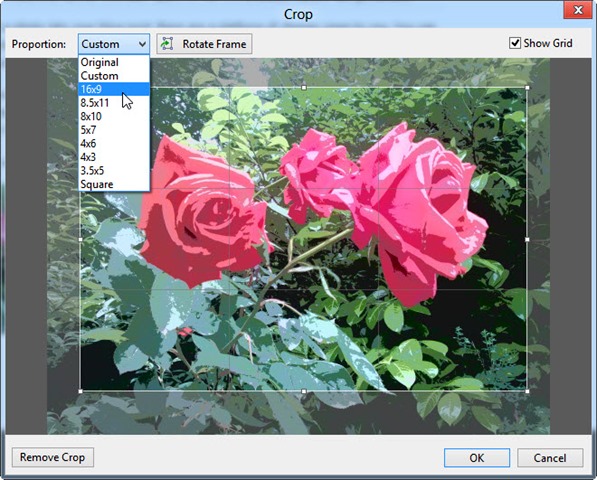
2. Clicking on the Crop icon will open a window containing your photo with a white square inside the photo that can be resized or reshaped by left clicking on one of the small squares and holding down the left hand mouse button, then dragging the lined square until you have cropped out the area of the photo that you don’t want to show. There are also some custom sizes for you to choose from via the drop down list, and you can also show a grid over your chosen area. Click on OK once you are happy with your Crop or click on Remove Crop.

Doing a crop in Writer 

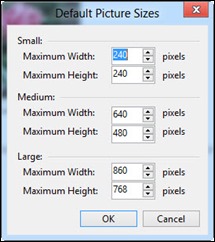
3. Next to Crop on the PICTURE TOOLS ribbon is the Resize area. Here you can customise your sizes for future use so that once set, when you click on Small, Medium or Large your photos are set to a size that you prefer to use inside your posts. To change the Custom size, click on the size box, a drop down list will be available, and you can select the last choice of Set Default Sizes.

Setting your default sizes of photos

4. Another window will open and you can then select the width and height for your default sizes of your inserted photos. Once set, in the future all you need to do is select Small, Medium or Large and your photos will be at your own custom size.

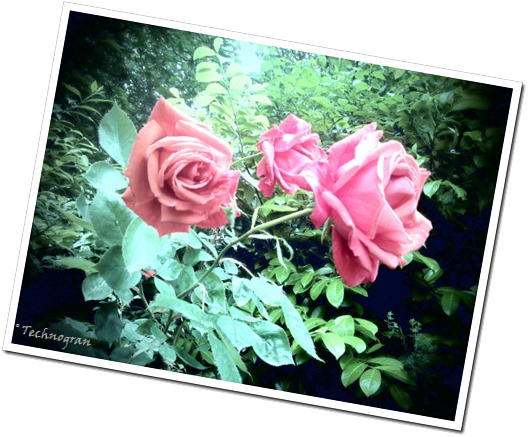
5. Next we come to Rotate. This feature allows you to rotate your inserted photo from Landscape to Portrait or visa versa, or you can Tilt the photo inside your text which gives a very attractive result.  Try it out to see how it looks.  You adjust the angle of tilt by sliding the slider either further to the right or left and once you are happy with your tilted photo, click on OK.

The Last Rose

6. Next area along the PICTURE TOOLS ribbon is Picture Styles. This allows you to add different surroundings, effects and shapes to your inserted photo. Choices are as follows: Inherent from Blog, None, Drop shadow, Instant Photo, Photopaper, Reflection, Rounded corners, solid 1pxl and solid 3 pixels. Try them all out by clicking on each one to see how it effects your inserted photo.

7.  Picture Effects are next in the Ribbon, so click on the Picture Effects icon in order to access the choices available. These are Recolour, Sharpen, Blur and Emboss. If you click on Recolour another windows opens containing other icons for you to select and you simply click onto each one to choose. Try them out on your photo to see which one looks best.

8. Clicking on Sharpen gives you the choice of a sharpen icon, Blur gives you no Blur or Gaussian Blur and Emboss allows you to Emboss your photo. Again, try them all out to see the effect. You can always change the effect back if you don’t like it.

9. Under the Picture Effects area is Contrast and this choice is adjusted by  altering the two sliders for Brightness and Contrast either left or right. Click on OK once your happy with your photo.

10. Lastly under Picture Styles we have Watermark. This allows you to watermark any inserted photos so that your name is placed on it for the purposes of copyright. Click on the Watermark icon and a window will open where you can choose your text such as your name, which font you would like to use for your watermark, the size and finally its position on your photo. Click on OK once you have set up your watermark and it will be added to the photo. (See above.)

11. In the Properties area of the PICTURE TOOLS ribbon, you can choose where to link to when your readers click on top of the photo, either the source picture or a web address, the options for the size of the source picture, and any alternate text you would like to display when the photo is clicked on.

12. Under the Settings area of the PICTURE TOOLS ribbon, you can set to revert to the original version of the picture before any effects etc were added, or set the current picture style, alignment, properties etc as the default for all other pictures.

f042dc0d-faec-4fbb-8fef-d2c2c440d34613.  Next in line on the PICTURE TOOLS ribbon is the Alignment area, and this basically allows you to place your photo to the left hand side of your text, to the centre, to the right hand side. Just choose the placement by clicking on one of the icons. You can then resize your picture if you wish to accommodate any text that you wish to have at the side.  Its also a good idea to set up a margin around your picture so that your text does not butt right up to the edge of your photo and look unsightly.

14. To alter the margin next to your picture and separate your photo from your text, simply click inside the box next to the relevant margin and increase the pixels. In my case, I have increased the pixels to 12 to the right hand margin, so that now my text is separate from the photo. You can adjust the spacing around your photo at the top, bottom, left and right, so that it all looks neat and is easy to read.

Next post, we’ll cover the Blog Account ribbon, and also adding Categories to our posts, setting our post date, updating the theme, and posting the same post to different blog platforms.

Technogran

Blogging with Windows Live Writer 6. Handling your blog account.

Blog Account.

The last ribbon tab is BLOG ACCOUNT. The features available to you on the Blog Account ribbon will actually depend on which blogging platform you are using. For example, there are more features available to you when using a Wordpress blog inside Writer than a Blogger blog. Let’s work our way through the Wordpress blog ribbon choices available to you first.

1. Click on the Blog Account tab at the top of the ribbon. Firstly in the ribbon, you have Blog Options. This is followed by Shortcuts and then finally Theme. We’ll work our way through them all.

Blog Options

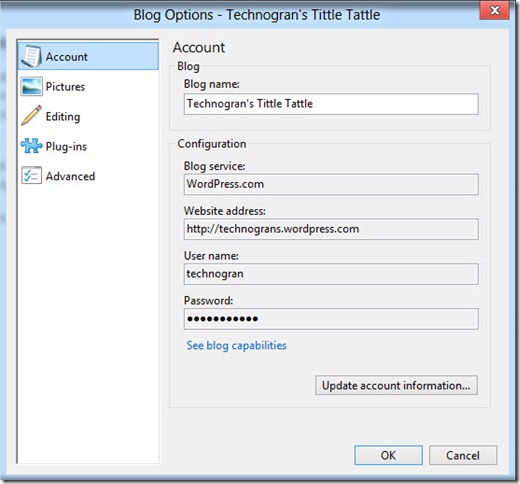
2. Click on the Blog Options icon. A window will then open. This window contains a list on the left hand side which begins with Account. This states all the details of your Wordpress account such as Blog name, and its configuration. If you need to change any details, click on Update account information at the bottom. You can also view all of your blog capabilities by clicking on that choice.

3. The next choice is Pictures. Here you can specify where you wish your included Pictures/Photo to be stored, either the blog platform itself (in this case Wordpress) or some other FTP site. For more details on setting up a different FTP site for your photos/pictures, go to http://windows.microsoft.com/en-GB/windows-live/writer-ftp-server-images-photos-ui

4. Next we have Editing. This choice simply allows you to update your theme so that you can see your posts as they will look on your blog, and also allows you to change your blogs text to read from left to right.

Enabling Plug ins

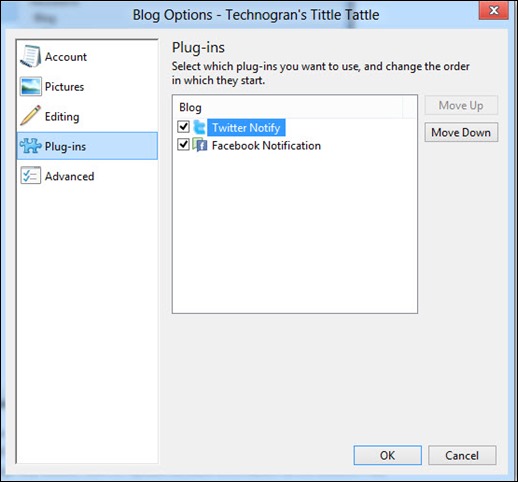
5. Next we have Plug-ins and this choice allows you to set up any Plug-ins you have downloaded to Writer to work with this specific blog, so that they will be enabled every time you publish a post instead of you always being prompted to use them. For this step by step, we have our Twitter and Facebook Plug-ins, and  by ticking one or both of them and then clicking on OK, we enable auto updates every time we publish  a new blog. You can also choose in which order each Plug-in is invoked.

6. Finally in the list under Blog Options we arrive at Advanced. This is fine left at the defaults.

7. Moving along the ribbon to the Shortcuts area of the BLOG ACCOUNT ribbon is a list of shortcuts to your blog as follows, View Site, Dashboard and  Manage Comments. All are pretty self explanatory in that they allow you to go immediately from Writer to those areas of your blog account. Let’s try out the Dashboard Shortcut. As long as you are signed into your blog account online, you will be taken to your Dashboard. Try out the Manage Comments shortcut as well.

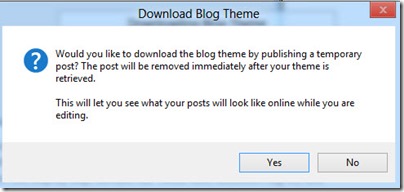
8. Lastly we arrive at the Theme area of the BLOG ACCOUNT ribbon. Clicking on the Blog Theme icon will show you your current theme as it is synced with Writer. If it doesn’t look right or you have recently been updating your theme or changed it in Wordpress online, you will need to click on the Update Theme icon. Writer will then attempt to fully sync with the new theme changes. NOTE! It may be necessary for Writer to create a temporary post (which should automatically be deleted) if it encounters problems syncing correctly with your theme. Click on Yes to allow this.

Temporary post in Writer

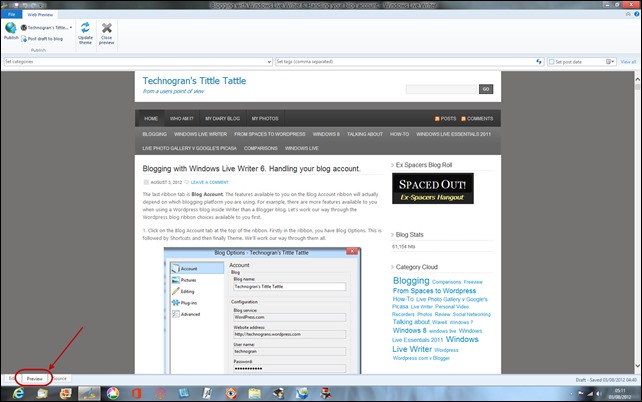
9. If you wish to see how your whole current blog post will look once published including your blogs Title and sidebar intact, then click on Preview at the bottom left hand side of the blog editing screen.

Fully preview your blog

10. Just for comparison, let’s take a look at the different choices offered for one of the other blogging platforms such as Blogger. The blog options will be the same, but under the Shortcuts area, we are only offered View Blog. Dashboard and Comments shortcuts are sadly not available at this time. You can still check your theme has synced correctly of course by clicking on Blog Theme and also you can Update your theme in exactly the same way as before.  If you wish to check that your blog has been fully synced with by Writer, click on the Preview tab at the bottom left hand side of the editing screen.

Blogger Blog Account ribbon

In my next post, we’ll work our way through the file tab which doesn’t have its own ribbon interface, instead having a drop down list, where you can edit any post that you published in the past as long as it was created in Writer, and is in my view one of Writer’s greatest strengths.

 Technogran

Blogging with Windows Live Writer. 7. Handling those files!

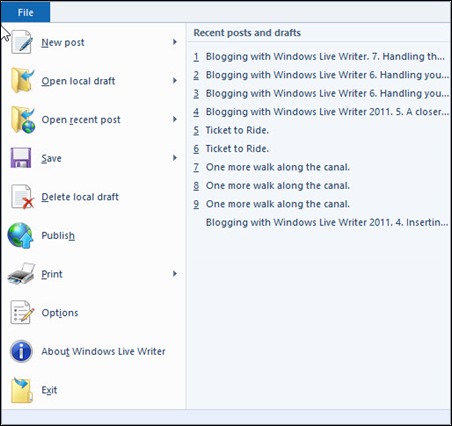
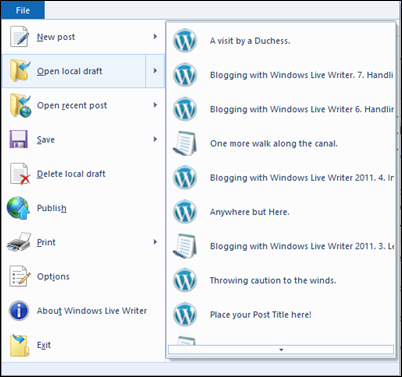
Now we’ll take a close look at the FILE tab. This is the only tab that doesn’t currently have its own ribbon interface, but instead shows when clicked as a drop down list of choices.

File drop down list

We’ll now work our way through the choices from this list, some of which have already been covered in other ribbon choices.

1. Clicking on the top choice of New Post will, in the case of Wordpress, give you two choices, New Post or New Page. (which if you use pages on your blog, allows you to compose one of those with Writer as well. This choice is sadly not available for Blogger at this time.

2. Open local draft. This choice opens a draft post that you have previously saved to your computer. Click on any of your saved posts in the right hand list to open it. To scroll down the list click on the small arrow at the bottom.

Screenshot (78)

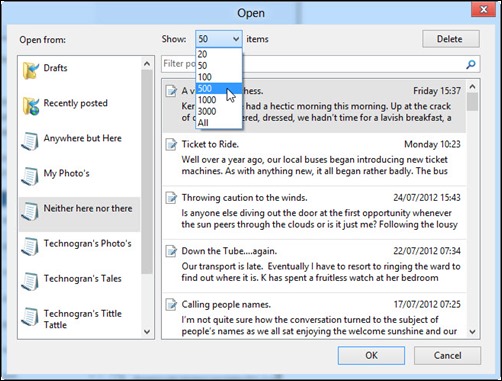
3. Open recent post will open any post that you have published to your blog. However, it also opens any post published to your blog over a set time as long as that post was originally constructed in Live Writer. To access any older posts, in order to edit one for example, simply click on the Open Recent post icon on the left. A new window will open up. On the left hand side will be a list of all of your blogs and on the right a list of the recent posts published.

4.  In a small box at the top next to show, you will see a default number of 25 posts. On the right is a Delete box.  By clicking on the Show box, you can adjust how many past posts Writer should bring down to edit. This can be adjusted depending on how long you have used Writer to compose and publish your blog posts on that particular blog account, because only posts constructed with Writer previously can be accessed. To access a particular old post, scroll down the list of posts and then select the one you require and Writer will then download it for editing.

Going back 500 posts

NOTE! There is a current problem with Writer fetching down any posts older than 20 on Wordpress at the moment, and you may receive an error message if trying to access older posts. All other blogging platforms such as Blogger are working fine.

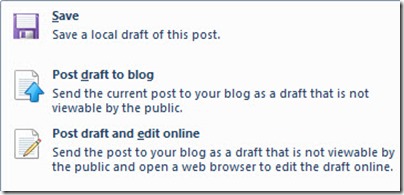
5. The next choice is Save, and you are offered three choices for your current post.  You can save a local draft to your computer, you can post a draft to your blog that is not viewable by the public and which you can then bring back down into Writer to edit at a later date, or alternatively you can post the draft to continue editing online.

Save choices

6. Next choice is  Delete Draft, which when selected presents you with a list of your currently stored drafts on your computer. To delete one, just scroll down the list and select it.

7. Publish is self explanatory and is also available in the HOME Ribbon. Clicking on it will immediately publish the current post to your blog.

8. Print will print out the current post via a connected printer and you are also offered the choice to Preview the post before printing.

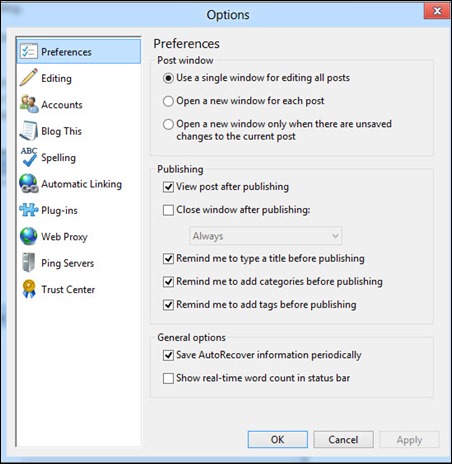
9. Next we arrive at Options. Selecting this choice will open up exactly the same window as is available from the HOME ribbon under the list of your blogs when selecting Manage your Accounts. If you wish to change any of the Options available from the list, click on the icon to change it, then click on Apply and OK to Save.

Remind me in Preferences

10. About Windows Writer gives you more information about Writer the version you are currently using and the build number. You can also access any log files from here by clicking on Show Log File.

11. Clicking on Exit will close Live Writer but if you have not done a recent save of your current draft, you will receive a warning notice to that effect and prompted to Save it first.

Next post we’ll cover setting up some Categories and setting our post dates including setting up a future date for publishing a post. . We’ll also take a look at posting the same post to two (or more) different blogging platforms, a feature which I tend to use a lot.

Technogran.