Let’s start Blogging!
One of the most useful programs I have found to use if you do any blogging is Windows Live Writer. I am constantly amazed by how many bloggers are not even aware of its existence. So I intend to do a series of posts about this wonderful little program that is part of the Windows Live Essentials package. You can of course just download Writer by itself if you are not interested in the other Live Essentials programs but it does work well with the other programs in the Live suite especially Live Photo Gallery. So let’s begin shall we?
1. Firstly download LIve Writer from HERE and install it.
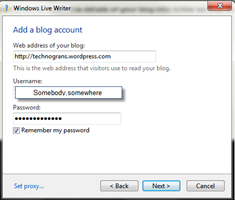
2. Once installed, on opening the program you will be prompted to insert the details of your blog into Writer so that it can fully ‘sync’ with it.
You will need to supply the URL of your blog, your user name that you supply when accessing your blog and also the password that you use. Once this is done Writer will sync with you blog, including all its settings, the theme style used, the fonts etc, so that as you compose a post for your blog, you can see exactly what it will look like when posted. Take a look at the pictures to see it syncing with my Wordpress blog. Writer also works with Blogger,Typepad, Live Journal, Windows Live Spaces and most of the popular blogging sites.
Now you can begin to insert some text. Writer will use the font specified in your blog theme by default but you can change this to another font if you wish. You can also give your post a heading. Any headings will also be as specified by your theme but again this can be changed so let’s make a heading, change the font and size, underline it, make it bold and then alter the font of our main paragraph.
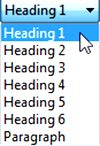 3. Once you have given your post a title (and who’s format you can’t unfortunately alter in Writer) Click on the small arrow in the box at the top of the writing area which currently says Paragraph. A drop down list will appear allowing you to choose different headers for your chapter or paragraph. Alternatively you can insert some text for your header (such as Let’s start Blogging!) and then highlight it, click inside the box and then choose the style for your chapter header. I have chosen Header 1 for my header. But I want to underline it as well, so again I will highlight it and then select U from the composing taskbar. Note. It is possible to alter the font/size/style for your chapter header after you have chosen the type of header from the drop down list by simply leaving it highlighted and then choosing Format, font, style, size.
Once your satisfied with your chosen header you can move onto the main content. If you don’t want the default font for your main text here is how you change that.
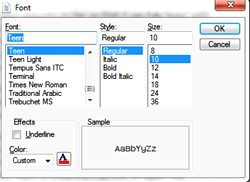
4. After moving you cursor from the Chapter Header to the main writing area, (Paragraph will now show in the box) click on Format from the Menu, then select font from the drop down list. A small window will then appear where you can select a different font, its style and its size. You can also change your fonts colour here which is very useful if you wish to highlight particular text within your post. Once you have selected your font and clicked on OK, you can begin to type in your content. So far, Writer is working for you more or less like a simple word processor. Now let’s change some settings in Writer for blogging. For example, how often you wish Writer to save your work to a draft copy so that you don’t lose any of your work. I tend to set mine to save to draft once every 2 minutes but this is entirely up to you. So let’s set that up next.
5. Click on Tools from the main menu bar at the very top and then select Options. A new window will open with lot’s of different settings for you to tweak. The top option is Preferences and here you can set up whether or not to use a single window when your editing your posts or a new window for every edit, whether or not you wish to be taken to your blog once a post is published to it and also any reminders that you need Writer to prompt you for before publishing a post such as Specifying a title, setting up categories and/or tags.
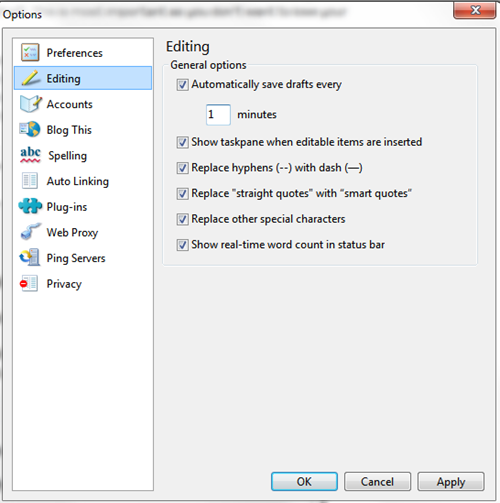 6. The option that we need for now is the Editing option so click on that. I’m going to save my drafts every minute but you can choose to save a draft as often as you wish. There are also other options that you might wish to choose here as well, including ‘show real-time word count in status bar’ which many bloggers might find useful.
There are lot’s of other options available in Writer and you might like to take a look at some of them whilst your in the Options window. Another useful Option is the Spelling option so let’s set that up now.
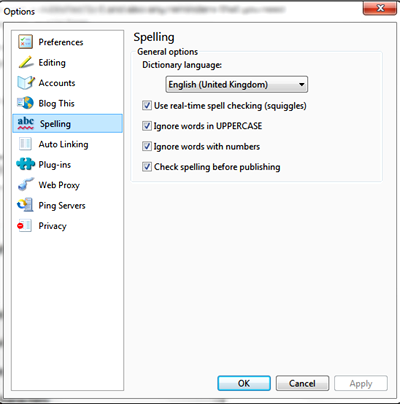 7. Click on the Spelling option in this window. Here you can specify which dictionary Writer should use (in my case the United Kingdom one) whether you want Writer to employ real-time spell checking, ignore words in Uppercase when spell checking, ignore words with numbers in them and/or check spelling before publishing. Just tick each choice that you prefer and then click on OK.
We’ll take a look at some of the other settings as we need them in later posts.
Next post I will move onto inserting pictures into your post and the cool things you can do with them in Writer.
TG
No comments:
Post a Comment
Say what you think